


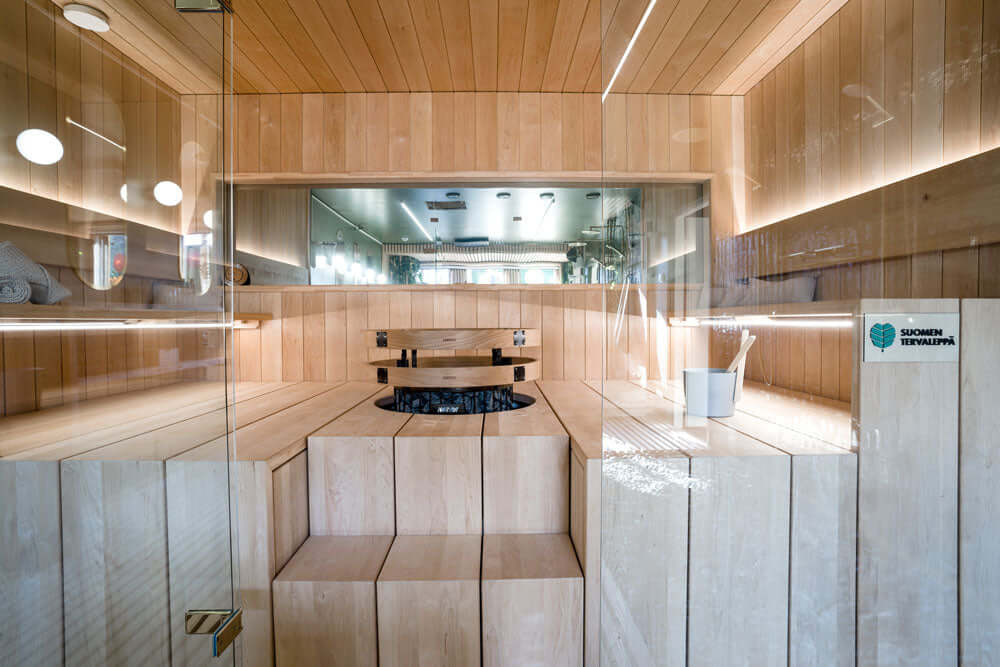

Why is sauna lighting design important?
The sauna is no longer just a place for washing; it is a home relaxation center where lighting plays a crucial role. Careful sauna lighting design improves both the aesthetics of the space and its safety of use. Too bright or cold light can break the soothing atmosphere of the sauna, while poorly placed light can leave steps in shadow, increasing the risk of tripping in humid spaces.
From a technical standpoint, design is critical because the sauna presents extreme conditions for electrical equipment. High humidity and large temperature fluctuations require components specifically designed for these conditions. When sauna lighting is chosen correctly, it lasts for years without the need for maintenance. Modern LED technology allows for precise light aiming and dimming, allowing you to change the sauna's ambiance according to your mood – from brighter cleaning light to dim, candle-like twilight.
Expert design also considers the placement of light sources in relation to the sauna stove and benches. The goal is often to avoid direct glare and utilize light reflected from surfaces, which makes the space visually larger and more inviting.
Bench lighting: Atmosphere with LED strips and fibers
Light placed under the benches or behind the backrest is the most popular way to implement modern sauna lighting. When the light source is hidden in the structures, the light filters softly and emphasizes the wood's texture without the LED dots being directly visible to the eye.
In bench lighting options, LED strips have surpassed fiber lights due to their versatility and ease of installation. LED strips specifically designed for saunas are an excellent choice, as they produce a completely even light line without pinpointing. A typical choice for benches is a moderate power, for example, 5W/m 24V LED strip, which provides sufficient ambient light without excessive heating.
- Placement: Under the front edge of the bench to illuminate the footwell or behind the backrest to reflect off the wall.
- Technology: Dotless LED technology ensures even light even in low profiles.
- Durability: Choose a product tested to withstand continuous temperatures of 110 °C.
Fibers are still a viable option if light is to be brought directly above the sauna stove, where the temperature often rises too high for standard LED components. In most cases, however, LED strips under the benches provide more comprehensive and easily adjustable light for the entire sauna.
Ceiling lighting: Choose spotlights or a stylish starry sky
Ceiling lighting requires special attention, as heat rises in the sauna. If you want to install luminaires on the ceiling, they must be of very high quality and heat-resistant. One popular way is to create a "starry sky" with small fiber optic lights, which perfectly withstand heat and create a dotted, magical atmosphere.
Another option is to use directional LED downlights, but their placement must be precise. Downlights should not be placed directly above the sauna stove but rather in corners or near walls, where they wash the wall surface with light. This emphasizes the sauna's materials, such as stylish paneling or a stone wall.
When choosing ceiling luminaires, ensure that their protection class is sufficient and that the electronics are effectively protected. It is often recommended that transformers be placed entirely outside the sauna or under the benches in a cooler space to prevent their lifespan from being shortened due to heat. In ceiling lighting, less is often more – a few precisely placed light points create a more stylish result than a continuous row of bright lights.
Color temperature and light intensity in the sauna
Color temperature is one of the most important factors for successful sauna lighting. In the sauna, warm tones that mimic the glow of fire or candles are traditionally favored. 2700K is very warm and inviting, while 3000K offers a slightly fresher but still soft white light.
Color rendering index (CRI) is also a significant factor. A high CRI value (CRI > 90) ensures that the natural shades of the wood – whether alder, aspen, or heat-treated wood – look natural and deep. A low CRI may make wood surfaces appear grayish or lifeless.
Dimmability is an absolute requirement in the sauna. During sauna use, the need for light is minimal, but for example, when cleaning, it is important to see every corner clearly. 24V LED systems offer excellent dimming capabilities without flickering, and they can be easily integrated into various control systems, such as Zigbee or Casambi solutions.
Safety and technical requirements: What to consider?
The sauna is a demanding space in terms of electrical safety, divided into different zones according to temperature and humidity. Sauna lighting must be implemented with components that meet at least IP65 protection class, meaning they are dust-tight and resistant to water jets (e.g., during sauna cleaning).
Key technical specifications for sauna LED strips:
- Voltage: 24V (recommended for stability and safety).
- Protection: IP65 or IP67 (silicone casing protects against moisture).
- Temperature resistance: Continuous use at least 110 °C depending on installation height.
- Power: Typically 5W/m – 10W/m is sufficient for ambient lighting.
Transformer placement is the most common place for installation errors. Even if the transformer is IP67 rated, it will not withstand the heat at the sauna ceiling line. The best place for the transformer is either outside the sauna (e.g., in a suspended ceiling on the washroom side) or under the lower benches, where the temperature remains moderate. It must also be ensured that the cables used are silicone-insulated and resistant to high temperatures.
Indirect light enhances the feeling of space in the sauna
Indirect light is a cornerstone of interior design that works particularly well in the sauna. By using LED aluminum profiles, such as Topmet's PINTA14 or SUORA14 models, you can install LED strips neatly and protected.
When light is directed up or down along the wall, it removes harsh shadows and makes the space feel more open. In small saunas, indirect light under the edge of the benches can "lift" the benches off the floor, creating a light and floating effect.
In designing indirect light, it is also worth utilizing surfaces. A dark wall treated with charcoal or sauna wax absorbs more light, which may require slightly more light output compared to light aspen.
Tips for sauna lighting installation and control
Successful installation begins with careful preparation. Before paneling, ensure that the electrical wiring is in the correct places. If you use wireless control, such as Zigbee or Casambi systems, installation is easier as you avoid switch wiring inside the walls. Wireless buttons can be placed exactly where desired outside the sauna or even at a safe height inside the sauna.
- Plan the wiring: Use heat-resistant connecting wires and ensure the tightness of connections with heat shrink tubing.
- Use profiles: Always install LED strips in an aluminum profile. It protects the strip from mechanical stress and facilitates cleaning.
- Place the transformer correctly: Ensure that the transformer is accessible for maintenance and that it is in a sufficiently cool space.
- Test before finishing: Turn on the lights before final attachment of benches and panels to ensure everything works and the light beams are as desired.
In terms of control, modern smart home integration allows the sauna to be connected as part of larger lighting scenarios. If you need expert assistance in choosing suitable products or with technical questions, you can always contact us.
Deliveries from the online store arrive quickly, and from our wide selection, you will find specialized products suitable for the sauna. If you have questions about technical requirements or need help with design, please contact us.


0 comments